OGRE Particle Editor
Tutorial
Welcome to the OGRE Particle Editor Tutorial. To read the manual, please visit the manual page.
In this tutorial we are going to create a simple particle system effect.
By creating this basic particle system we will become familiar with many of the editors features and hopefully we will get an idea of what is possible with the editor and OGRE particle systems.
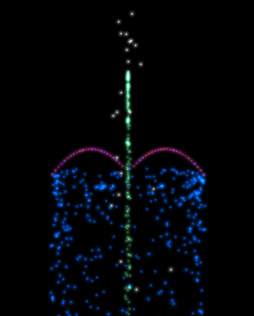
This is the particle system we will create in this tutorial - a simple water fountain type effect. (looks better in action, honest)
Note: This tutorial makes the assumption that you have not modified any of the editor data files.
Ok, load up the Particle Editor. The default particle system should be loaded in the
background, and all the main editor windows will be expanded and visible, with the exception of the Editor
Options Window which is visible but collapsed by default.
Go to the Template Management Window and select the Available tab.
A list shows all the available particle system script names, template names and whether the system is
loaded or not. Unload the default particle system by clicking on the Unload All button. The Particle System
Parameters Window will be refreshed by removing all parameter controls and by displaying a message
saying "Selected Particle System Template not loaded".
Let's create a fresh new particle system. Select the New Template tab, and enter the name of your new template in the template name input box.
Let's call it "tutorial1", and make sure that the Use Defaults radio button is selected.
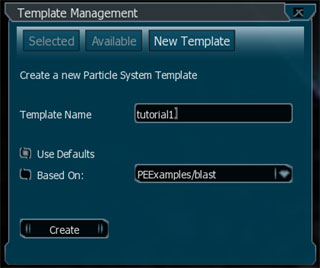
Creating a new template based on the engine defaults.
Click the Create Button.
Your new template should now be created and available to load. Go to the Available tab.
Your new particle template will be visible in the list with a script name of "NOT_SAVED" - this is because
our new template exists only in this editor instance, but will not appear in any scripts for future use
unless we save it. We'll save it later; let's play around with it a bit first.
Making sure that your new template is selected in the list, click on it again - this should jump you to the
Selected tab. Click on the load button.
Your new template is now loaded, but you will not see anything particle related flying about yet.
That's because we need to add at least one emitter. Go to the Particle System Parameters Window. There
should only be a Basic tab component button visible in the upper section.
In the lower section of this window, in the action box, you should see (amongst other controls) an
Add Emitter button next to a drop down list. Make sure that the Emitter Type drop down box is showing "Ring" as
the selected emitter type, and then click the Add Emitter button.
A Ring emitter will be added to your particle system, and you should now see a component tab button
labelled "Emitter 1".
You should also now be seeing some big white blocks jigging about slightly. This might not look too exciting, but
don't get discouraged! What you are seeing are particles with a default size and material - the sizes
being rather big at 30 units in width and height, and the material being a base white colour. Actually, OGRE's real
default particle size is 100 units in width and height, but because this exceeds the Particle Editors min and max settings in
the parameters.cfg config file, they are reduced to the particle_width and particle_height maximum values.
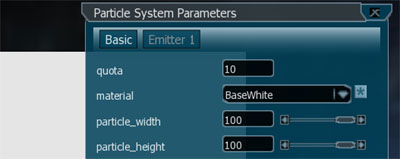
Adding a particle emitter is created with a default basewhite material.
Let's fix up our Basic parameter values a little. Enter the following values into the Basic panel. Find the name
of the relevant parameter and enter the value into the text box, or select the relevant item in the GUI controls.
Basic
quota = 2000
material = PE/lensflare
particle_width = 3
particle_height = 3
cull_each = false
Now that the particle size is smaller, its easier to see whats going on. Now let's modify the emitters parameters.
Click on the Emitter 1 component button. When selecting an emitter like this, an Area Emitter guide and a Direction Emitter Guide
will appear around the emitter. The Area Emitter Guide can be useful to better visualise the actual position and size of the emitter.
The direction Emitter Guide is an arrow that points in the direction that the emitter will emit particles. The guides can be switched
off in the Editor Options Window.
Change the following parameter values for Emitter 1:
emitter 1 (Ring)
colour = 0 0.4 1 1
emission_rate = 200
position = 0 -20 0
velocity = 0.01
time_to_live = 3
width = 60
height = 60
depth = 2
inner_width = 0.9
inner_height = 0.9

Emitter guides can help to give a rough idea of the size and dimensions of the emitters area.
You should now have a small ring of slowly drifting blue particles.
Before we continue working on the parameter values, lets make some room. We dont need the Template Management Window
open, so close it by clicking the little cross in the right hand corner of the window. Go to the Editor Options Window
and make sure the Camera Control tab is selected. Change the Camera Mode to "Target" by selecting it in the drop down box.
We want the particle system to appear at the left hand side of the editor window while we work, so move the camera to the right
by clicking the Right Arrow button. Position the camera (use the zoom a little if you like) so that the particle system is positioned in a
comfortable place next to the Particle System Parameters Window. Now close the Editor Options Window.
Let's add another emitter. Go back to the Basic tab in the Particle System Parameters Window, and this time select the "Point"
emitter type. Add one to the system by clicking the Add Emitter Button.
An emitter tab component button called "Emitter 2" should now appear. Select it, and modify the parameters with the
following values:
emitter 2 (Point)
angle = 4
colour = 0.23 0.54 0.35 1
direction = 0 -1 0
emission_rate = 80
position = 0 20 0
velocity_min = 10
velocity_max = 20
time_to_live_min = 1.5
time_to_live_max = 2.5
It is advisable to save your work from time to time in case your cat jumps on your keyboard and wipes out hours of work, so let's do that now.
On the Status Bar, click the Reset Windows button to show the editor windows that we closed earlier. Go to the
Template Management Window and click the Selected tab. Enter a valid particle script file name into the text box
(call it test.particle), and then press the Save button. A confirmation box will appear, press Ok, and press Ok at
the message box that appears saying that your template has been successfully saved to file.
If you take a look in the Available tab, you will see that your new particle system template now appears with its script name.
Close the Template Management Window and the Editor Options Window again. Now its time to add another emitter.
On the Basic panel select a Point emitter type and add one to the particle system. Select the new Emitter 3 tab and
make the following parameter changes:
emitter 3 (Point)
Firstly, change the position of this emitter to sit somewhere to the left of the center, balancing on the side of Emitter 1's
ring:
position = -30 -20 0
Give the particles a bit of velocity so we can see where they are traveling:
velocity = 40
Now let's change the direction of the emitter to shoot at the position of Emitter 2. To save you having to trial and error this until
you guess right, just use the Direction Helper Window. To show this window, click on the little blue button found next to the Direction
parameters slider control. From the drop down box choose to point at Emitter 2, then click the Apply Direction button.
direction = 0.6 0.8 0
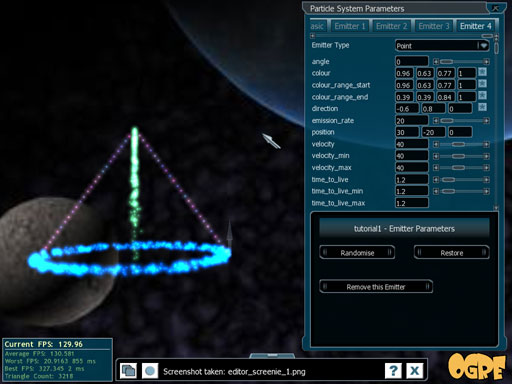
Enter these remaining parameter values:
colour = 0.96 0.63 0.77 1
colour_range_end = 0.39 0.39 0.84 1
emission_rate = 20
time_to_live = 1.2
duration = 4
repeat_delay = 2
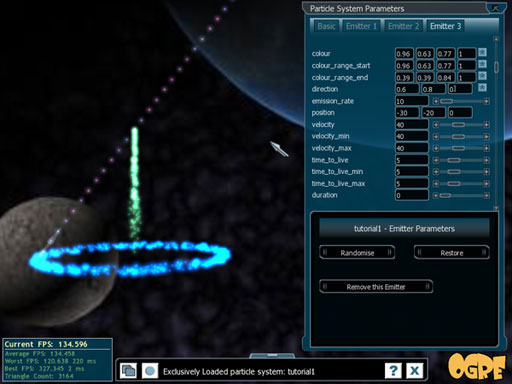
Setting an emitters direction to point at other emitter positions.
Now that we have an emitter sat on the left hand side of our particle system, it would be rude not to add another
one to take the right hand side. However, this time its going to be even easier, because we are going to clone Emitter 3.
Go back to the Basic tab and click on the Emitter Type drop down box. Scroll down a bit until you see the item called
"Clone Emitter 3". Select it and click on the Add Emitter button.
Your fourth emitter has now been added to your particle system. It looks almost exactly like Emitter 3, doesnt it?
The only things we want to change are the emitter's direction and position parameters:
emitter 4 (Point)
direction = -0.6 0.8 0
position = 30 -20 0
Cloning an emitter is a quick and easy way to copy an existing emitters parameters.
There is one final emitter to add to give us that much desired "splash of spray" effect. It's a Point emitter
again, so select it and add it, then change the following parameters:
emitter 5 (Point)
angle = 10
position = 0 20 0
velocity_min = 40
velocity_max = 50
time_to_live = 3
duration_min = 4
duration_max = 6
repeat_delay_min = 0.5
repeat_delay_max = 1.5
Let's save our work again. Get the Template Management Window back up again by clicking the Status Bar's Reset Windows button.
Go to the Selected tab and press the Save button.
Notice that the emitters in our new particle system that have a time delay set do not seem to be in sync. We want it
so that when one emitter emits some particles, the others emit at the same time. The reason they are out of sync is because we added them
at a random point in time. To remedy this, simply hit the Reload button in the Selected tab (make sure you have saved it first!).
Aaah, that's better.
At this point, we should have a rather strange looking particle system...lets make it look even stranger! Lets add an Affector.
Go to the Basic tab panel and select the item called "LinearForce" in the Affector Type drop down box. Add it to your system.
As soon as you add the affector, your particles will all drop from the sky as if gravity was pulling them down.
Just for a bit of fun, select the affectors tab and then press the Randomise button a few times.
When your fun is all spent, lets get back to business and fix up this affectors parameters. Hit the Restore button, and
then make sure the parameter values are as follows:
affector (LinearForce)
force_vector = 0 -50 0
force_application = add
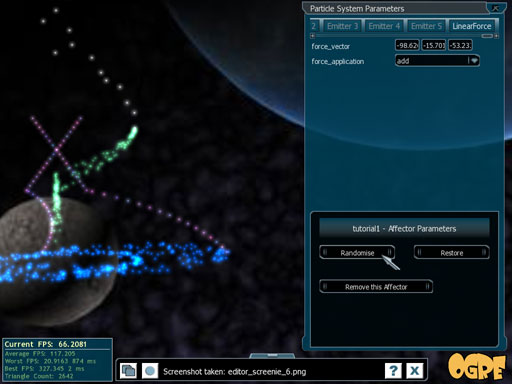
Adding a LinearForce Affector and applying random values is fun!
Okay, so there you have it, a water-type-fountain thing. If you are very proud of your particle creations, you may want to
fly around it and look at it from different angles, maybe take some screenshots. To do this, try pressing the "F1" key. All your
GUI windows will disappear. Fly around the scene a bit with your mouse and the "A", "W", "S" and "D" keys. Try pressing the pause key
a couple of times, and see what happens to your particles.


Going into "Free Camera" mode is good for flying around your creations and getting up close and personal.
That concludes this tutorial. Have fun!